Building Scarlet Moon Hall
Scarlet Moon Hall is one of the “haunted keeps” located in the Dessarin Valley and an important location early in the 5th edition D&D adventure Princes of the Apocalypse. The gallery that follows shows how I built the keep for my game using primarily Dwarven Forge City Builder terrain and D&D Dungeon Tiles. Below the gallery is a parts list for those interested.
Click the individual photos to read design and build notes for each floor.
Parts List
The following is a list of parts to build Scarlet Moon Hall similar to the way I have. In some cases it varies slightly from what I actually used as I ran out of pieces here and there and made due with what I had. I have linked to sets on the Dwarven Forge site that contain the pieces in question, but note that many pieces appear in multiple sets.
1st Floor (The Downward Path)
- 3 Solid Stone Floors
- 1 Stone Foor With Stairwell Hole
- 3 Solid Stone Walls
- 4 Arrowslits Walls
- 1 Stone Wall With Door
- 4 Stone Corner Posts
- 2 Stone Double Posts
- 2 Wood Double Posts
- Ruined Stone Walls and Ruined Stone Corners
- 2 pieces of foam board or similar as supports (~5 10/16″ and 3 10/16″ in length)
Here, and throughout the tower, one could opt to use only stone double posts, only wooden ones, or a combination of both. I chose to use both on the exterior walls for aesthetic and cost reasons.
Wall type and placement can also be varied. I chose to alternate solid stone walls with arrowslits, both horizontally and vertically.
2nd Floor (The Downward Path)
- 4 Ruined Stone Floors 4×4 or 4 Ruined Wooden Floors 4×4
- 4 Solid Stone Walls
- 4 Arrowslits Walls
- 4 Stone Corner Posts
- 2 Stone Double Posts
- 2 Wood Double Posts
3rd Floor (Upper Entry Chamber)
- 2 Solid Wood Floors 4×4
- 2 Ruined Stone Floors 4×4 or 2 Ruined Wooden Floors 4×4
- 4 Solid Stone Walls and/or Stone Magnetic Walls and/or Stone Walls With LED Torch
- 3 Arrowslits Walls
- 1 Stone Wall With Door
- 4 Stone Corner Posts
- 2 Stone Double Posts
- 3 Wood Double Posts (one for the interior)
- 1 Steep Stairs
If you use the ruined wood floors, the exterior will match the other wood floors (the outsides of the floor pieces are brown).
In addition to solid stone walls, one has the choice of magnetic walls and walls with LED torches to spruce up this build.
4th Floor (Cultist Barracks)
- 3 Solid Wood Floors 4×4
- 1 Wood Floor With Stairwell Hole 4×4
- 4 Solid Stone Walls and/or Stone Magnetic Walls and/or Stone Walls With LED Torch
- 3 Arrowslits Walls
- Magnetic Accessories (e.g. Crossed Swords and Tapestry)
- 4 Stone Corner Posts
- 2 Stone Double Posts
- 4 Wood Double Posts (two for the interior)
- 1 Steep Stairs
Here and elsewhere, it is possible to substitute a double posts with two corner posts. However, the double posts serve to hold adjacent floor pieces together, giving your build stability.
5th Floor (Elizar’s Chamber)
- 3 Solid Wood Floors 4×4
- 1 Wood Floor With Stairwell Hole 4×4
- 3 Solid Stone Walls and/or Stone Magnetic Walls and/or Stone Walls With LED Torch
- 3 Arrowslits Walls
- 2 Stone Center Window Walls
- 2 Closed Shutters
- 2 Open Shutters
- 4 Stone Corner Posts
- 2 Stone Double Posts
- 4 Wood Double Posts (two for the interior)
- 1 Magnetic Alchemist Shelf
- 1 Table, Chair, Bookcase, and Ladder
In my build, I used two more stone center window walls for the North wall (instead of a solid wall and arrowslit wall) simply due to running out of wall pieces.
Attic
- 3 Solid Wood Floors 4×4
- 1 Wood Floor With Trapdoor 4×4
- 8 Solid Tudor Walls (or 8 Solid Stone Walls if you prefer)
- 4 Wood Corner Posts (or 4 Stone Corner Posts)
- 6 Wood Double Posts (two for the interior); or 2 Stone Double Posts and 4 Wood Double Posts (two for the interior)
- 1 Ladder
I chose to make the walls of the attic Tudor style as I thought it helped offset the attic a bit from the stone walls of the structure.
Roof Support
Alternately, one could use a combination of any type of wood floors, as it simply supports the roof.
Roof
- 4 Slate 2″ x 4″ Roofs
- 4 Slate 4″ x 4″ Roofs
- Assassin’s Perch
- Thick cardboard
Using the 2″ x 4″ roof pieces creates a roof that isn’t as deep as the rest of the keep. One could alternately use a total of eight 4″ x 4″ roof pieces.
Scaffold
The pieces for the scaffold came from a variety of D&D Dungeon Tiles sets, but the most useful are found in DU6 Harrowing Halls and DU7 Desert of Athas.
Tents
These are great papercraft tents designed by Dave Graffam Models. Assembly required.
DIY Miniature Terrain: Glowing Pillars
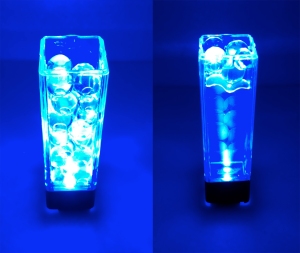
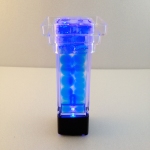
Pillars are a common feature in many dungeons and ruins, and magical pillars can provide an interesting terrain feature for encounters. I’ll show you how with a few supplies from your local craft store you can make great looking glowing pillars to enhance your next game.

To make four glowing blue pillars, you will need the following, all of which can be found at Michael’s craft stores:
Components
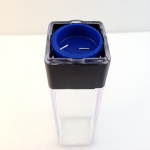
 Fillable Pillar Set
These are the core of the project. The columns themselves are almost exactly 1″ by 1″, which is perfect for D&D, though the top and base are larger (around 2″). Fortunately, they can be removed. The pillars come in 4″ and 6″ tall (I chose the 4″ for my purposes). Ashland Blue Submersible LED Lights 4 pack
To make the pillar glow, we need a light source, and these bright blue LEDs do the job nicely. Of course, if you want something other than blue pillars, look for another color LED instead. You’ll need lights that are no wider than ~1″ in diameter, and no taller than 3/4″. Liquid Water Gems, Blue
The trickiest part of this build was figuring out a way to get the column to actually “glow”. The LED needs something to illuminate otherwise it will just look like a clear plastic column with a light at the bottom. That’s where these water gems come in. These little spheres are made of a polymer that absorbs water, and will scatter the light we shine through them. Getting them in the same color as the LED enhances the overall effect.
Additional supplies you will need include:
- Plastic wrap (e.g. Saran Wrap)
- Electrical tape
- Four dimes
- Water
- Scissors
Build Instructions
- The submersible LEDs that we bought are too big to fit into the pillars as they are. Fortunately, they are easily taken apart. Simply grab a hold of the clear plastic top with one hand and the colored plastic bottom with the other, and twist the top counterclockwise. With some luck, it will unscrew, allowing you access to the LED light resting in the bottom piece. The light is part of a smaller plastic piece that also holds the batteries. Remove this whole piece (light and batteries, which I will call the “assembly” for easy reference), and put the plastic top and bottom aside (they won’t be used).
- Take a plastic pillar and remove the top and bottom pieces. Notice that inside the pillar there are actually two cavities (it isn’t hollow completely through): a large area, and a small one. The small one is going to house our light.
- Take the LED and battery assembly you removed from the submersible light housing and set it in the small section of the pillar so that the light points toward the larger section. You’ll probably want to put the batteries aside for now, if they haven’t already fallen out. It will be a tight fit, so you’ll probably need to set the pillar on a hard surface with the bottom of the light down and give it a good push from the top to get it in completely. Push firmly enough to get it in place, but don’t be too forceful or the plastic pillar may crack (no matter what you do, it will probably show some signs of fatiguing at the base).
- You can hide the light in the bottom by wrapping a length of electrical tape about 4″ long around the based of the pillar.
- Place the two batteries (CR2032) into the LED assembly such that the plus sign is facing away from the light. The original enclosure had a metal piece that was used to complete the circuit in the light by connecting the batteries to a small piece of metal sticking out of the bottom of the assembly. Because we’ve removed this piece, we need something else to close the circuit. My quick fix was to put a dime underneath the batteries to ensure a good connection. You may need to fiddle with the wire just a bit to make everything fit (but don’t bend it too much as it may break)
- To keep everything in place, wrap a 1 & 1/2″ piece of electrical tape across the bottom of the pillar. At this point, the LED should be lighting up. If it doesn’t, make sure your batteries are in correctly and the metal piece at the base of the assembly is making good contact. You may find that the contact isn’t good unless you stand the pillar upright, which is fine.
- In order to disperse the light from the LED, we now fill the large cavity in the plastic pillar with the Liquid Water Gems. You may find a spoon is helpful here. Take your time, these little spheres are slippery and have a habit of escaping and bouncing their way to freedom. Fill the pillar to the top with water gems.
- To give the illusion that the pillar is mostly solid, slowly fill the pillar with water to about an inch from the top. Because of the properties of the water gems, they will appear to mostly disappear as they are covered in water.
- Cut a small piece of plastic wrap about 2″ square. Cover the top of the pillar with it so that it is even, wrapping it along the sides so it is flush.
- Finally, take one of the plastic caps of the pillar and slowly slide it over the top of the pillar, pulling the plastic wrap taught and sealing it. (Note: Although this will form a seal good enough to keep the water and gems from spilling everywhere, it’s not exactly water-tight. I don’t recommend resting these pillars on their side.) I left the bottom caps off of mine in order to fit nicely on a 1″ square grid (the bases being more like 2″).
- To turn the pillar light off, simply remove the tape from the bottom and take out the batteries.
Terrain Power
What’s a neat looking bit of 3D terrain without some crunch to back it up? Here’s an example of a fantastic terrain and terrain power that you can use in your game to go along with the glowing pillar:
Necrotic Crystal Pillar
Crystal pillars often resonate with power, sometimes enhancing what is already present in the environment, other times specifically attuned through ritual or magic to a particular energy. These crystals pulse with necrotic energy fueled by the Shadowfell and focused by unholy rites, imbuing those bathed in its light with the withering power of the dead and dampening the power of the divine.
Effect: All evil creatures within 20 squares of a pillar (or for sake of simplicity, within the same encounter area) gain +5 necrotic damage and resist 5 radiant damage. The effects of multiple pillars do not stack, but DMs could place several pillars in an area to challenge PCs to destroy them all to eliminate the effect. Any time necrotic damage is done as a result of this effect (or radiant damage resisted) a player can make an Insight Check (+2 if trained in Arcana) at a moderate DC for the encounter level as a free action to recognize the effect is coming from the pillars. Similarly, a player can actively study a pillar with an Arcana Check at a moderate DC to reach the same conclusion.
Usage: PCs can destroy a pillar to cancel the effect as well as shower their enemies in crystal shards (see Shard Explosion below). Crystal Pillars have the following stats:
HP: 15 AC: 4 REF: 12 FORT: 4 WILL: —
Immune: poison, psychic
Resist 10: acid, cold, fire, lightning, necrotic, radiant
Vulnerable: 5 force, 5 thunder
Single-Use TerrainShard Explosion
The crystal pillar explodes in a shower of shards.
Reaction
Requirement: A Crystal Pillar is destroyed.
Target: Each creature in close blast 2 (centered on pillar)
Attack: Encounter Level +3 vs. Reflex
Hit: Consult “Damage By Level” table for Two or More Targets for encounter level
Miss: Half damage.
Effect: The blast becomes an area of difficult terrain.


